Illustrations by Steve Sanford
From the January-February 2011 issue of Scouting magazine
How to start a fire in the woods, even when it’s wet.
One a bone-dry day or when there’s plenty of dry paper or fire-starter, anyone can make a fire. If the weather deteriorates to a persistent rain, they might get smoke. But that’s no guarantee they’ll get fire. Here’s how you can make a fire when the woods are wet with rain. 
This method isn’t fast, but it works with any kind of wood—even damp wood. You’ll need a:
- Sharp knife. To split fine kindling, set the sharpened edge of the knife on the end of an upright piece of wood then pound the spine through with a thick stick. Use a folding knife with a secure lock so the blade won’t close on your hand when you pound on the spine.
- Folding saw.
- Small hatchet to use as a splitting wedge, never as a chopper.
First, collect your wood. Locate a dead, downed tree, out-of-sight of tents, trails, and waterways. Saw off an arm-thick limb. Touch the sawed end of the limb to your cheek (the center should feel dry). Don’t worry if there’s a ring of wet wood near the bark; you’ll discard it when you split the piece. Reject the wood if it smells damp or punky. The wood is good if it passes both cheek and smell tests.
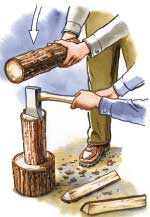
Saw the limb into footlong sections and split each section into kindling. Note that the hatchet is used as a splitting wedge so there’s no chance of an accident (Figure 1).

FIGURE 1, at left: Splitting wood is easier (and safer) with two people. Hold the hatchet with both hands and have a friend knock it through.
Hold the hatchet firmly with both hands and allow a friend with a log chunk to pound the hatchet head through.
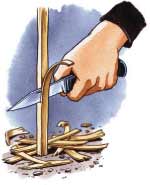
Use that same procedure (with a lighter log) to split fine kindling with your knife. Then, use your knife to prepare your tinder. Cut a handful of wafer-thin shavings (Figure 2) from your dry splittings.
FIGURE 2, at right: Now that you’ve reached the dry part of the wood splittings, slice off several wafer-thin shavings to use as tinder.
Assemble the tinder (a handful of dry wood shavings no thicker than a match), kindling (one-eighth to one-quarter-inch thick dry wood splittings), and fuel (quarter-split logs). Trim all bark and damp wood from your tinder and kindling, and separate your wood into piles—tinder, kindling, and fuel.
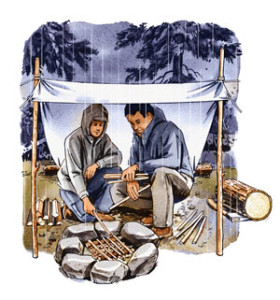
If it’s raining, work under a tarp so that all the materials stay dry.
Starter Accessories
- Carry a candle and chemical fire-starters.
- Cotton balls dipped in Vaseline, a flattened wax milk carton, and cigar-size newspaper logs that have been dipped into melted paraffin make good fire-starters. Don’t use loose newspaper pages; they absorb moisture on damp days.
- Make a “fire blower” as a bellows to nurse a developing flame by attaching a 6-inch piece of aluminum or copper tubing to a piece of rubber hose.
Build It Right
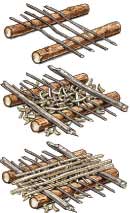
 Set two 1-inch-thick sticks about 6 inches apart on the ground (Figure 3, at right). Place four pencil-thin support sticks across the base. Space the support sticks about half an inch apart.
- Stack an inch-thick layer of wafer-thin shavings on top of the support sticks. Leave some space between each shaving to allow for airflow. Set two half-inch thick “bridge” sticks across each end of the base structure to support the heavier kindling you’ll add next.
- Place fine, split kindling across the support sticks. Splittings should be parallel to one another with plenty of space in between. They should not compress the tinder below.
- Apply your match directly underneath the tinder (shavings). When the first flame appears, hand feed shavings (not kindling) into the developing flame. Don’t add kindling until you have a reliable blaze. The raised firebase will produce a powerful draft that creates a bright, smoke-free flame.
Cliff Jacobson is a Distinguished Eagle Scout and the author of more than a dozen popular outdoors books.

Follow us!